Showing posts with label holidays. Show all posts

Monday, January 2, 2012

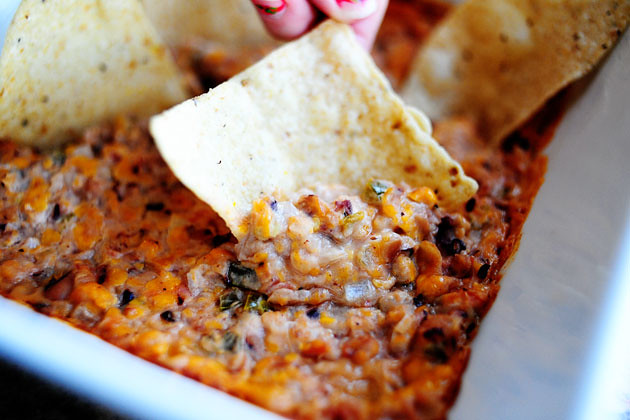
Black-Eyed Pea Dip

Photo courtesy of The Pioneer Woman Cooks

 Where do I begin!?  We had a wonderful weekend celebrating the New Year with our little family of five and some friends.  Jonathan and I finally bit the bullet and made my grandfather's famous Seafood Gumbo recipe.  Since it will fully feed an entire army, we decided we would share the love with some friends, so we invited over a few last night for dinner.  Since it was New Year's Day I couldn't NOT have black-eyed peas.  SERIOUSLY!  So, I ran to the arms (read: website) of my steadfast Pioneer Woman for a grand recipe including the traditional New Year's Day ingredient.  Lo and behold, she had a dip recipe that looked delicious, so I figured I would give it a shot.  I mean, I had a steaming 4 gallon pot of gumbo on the stove.  I didn't need to fix an entire pot of peas, so the dip was just what we needed.  It was a huge hit and something I will definitely make again.  To make things even better, apart from the can of black-eyed peas, I had everything else in the recipe in my fridge or pantry.  Secondly, it took about 3.5 minutes to assemble and 20 minutes to bake.  Simple.  Scrumptious.  Seriously, the pan was empty in now time.

Black-Eyed Pea Dip

Ingredients:
  • 1 can (14-ounce) Can Black-eyed Peas
  • 1/4 whole Onion, Chopped Fine
  • 1/4 cup Sour Cream
  • 8 slices Jarred Jalapenos
  • 1 cup Grated Sharp Cheddar Cheese
  • 3 Tablespoons Salsa
  • Hot Sauce, to taste
  • Salt And Black Pepper To Taste
Directions:

Preheat oven to 350 degrees.
Drain black-eyed peas and partially mash, leaving some whole.  Add all other ingredients, stirring to combine.  Spread into a 1 1/2 quart baking dish and bake for 20 to 30 minutes until hot and bubbly.
Serve with tortilla chips!

Wednesday, November 24, 2010

Cranberry Scones

Photo Credit: Annie's Eats
I came across this recipe on Annie's Eats several weeks back, and instantly knew I wanted to try them. I, by nature, shy away from baking because it seriously.intimidates.me.  However, I keep finding delicious recipes that whet my appetite to try my hand at it.  So, my sister-in-law decided to try to tackle these babies together today for some pre-Thanksgiving Day baking!  Now, they were not a traditional scone texture, but they were divine!

It was so simple to follow this recipe, and even though the dough didn't turn out like it should have, I have gained some confidence for baking another batch of scones!  I can't wait.  Until then, try these scrumptious cranberry scones.  They tasted wonderful!

Cranberry Scones

Yield:
8-10 scones


Ingredients:
1½ tbsp. freshly grated lemon zest
2½ cups all-purpose flour
½ cup plus 3 tbsp. sugar, divided
1 tbsp. baking powder
½ tsp. salt
6 tbsp. cold unsalted butter, cut into small pieces
1¼ cups fresh or frozen cranberries, coarsely chopped
1 large egg plus 1 large egg yolk
1 cup heavy cream
Additional sugar for sprinkling
Slivered almonds (optional)


Directions:
Preheat the oven to 400˚ F.  Line a baking sheet with parchment paper or a silicone baking mat.

In a food processor, combine the lemon zest, flour, ½ cup of sugar, baking powder and salt.  Pulse briefly to blend.  Add in the cold butter pieces and pulse again briefly until the mixture resembles coarse meal and the butter pieces are no larger than peas.  Transfer to a medium mixing bowl.

In a small bowl, toss together the chopped cranberries (I ran mine through the food processor for a brief few seconds) and remaining 3 tablespoons sugar.  Stir this into the flour-butter mixture.

In another small bowl or a liquid measuring cup, combine the egg, egg yolk and heavy cream; whisk to blend.  Add the liquid ingredients to the bowl with the dry ingredients and stir gently with a spatula or wooden spoon just until all the dry ingredients are moistened.  Knead gently to be sure the dough is evenly mixed, being careful not to overwork the dough.

Place a 2½- or 3-inch round biscuit cutter on the lined baking sheet.  Scoop some of the dough inside the cutter and pat down gently to form a 1-inch thick round.  Repeat with the remaining dough, placing the rounds 2-3 inches apart on the baking sheet.  Sprinkle lightly with additional sugar.
Bake in preheated over until light golden brown for 15-20 minutes.

**To freeze before baking, flash freeze at this point.  Place the baking sheet with the shaped scones into the freezer and chill until frozen.  Transfer to a freezer-safe plastic bag and store until ready to bake.
**If baking from the freezer, add approximately 5 minutes to the original baking time.


***At the last minute, I decided to add some slivered almonds to the tops of my scones!  It was a GREAT little addition if you happen to have some on hand!  I'll DEFINITELY do it the next time.

Saturday, January 16, 2010

Pumpkin Spice Cake

I just love the Fall and all the yummy and smelly-good things that go along with it! I am a big fan of all of the pumpkin-flavored things that come out this time of year: pumpkin spice lattes, pumpkin spice chai, pumpkin bread, and have you ever tried Pecan Pumpkin Butter from Williams Sonoma? That stuff is incredible.

I have tried making pumpkin soup.

Night.mare.

I'll have to share that story another time. But, all I am seeing are visions of orange mush. Spilled all over my mother's minivan. It was tragic.

However, here is a delicious and simple recipe I tried last night involving pumpkin that is fool-proof, easy, delicious, and low in fat. I

I made this pumpkin-spice cake yesterday, and it is delicious! Try it sometime. Seriously, it couldn't be simpler.

Pumpkin Spice Cake

Ingredients:

1 box of spice cake mix
1 can of pumpkin
1/2 can of water

Directions:

Combine all three ingredients in a bowl and mix until smooth. Pour into your favorite cake pan. (I used a bundt!) Bake cake according to the directions on the box, let cool, and serve. For a beautiful display, sprinkle with powdered sugar.

This cake is so good, so moist, and just perfect for Fall. It's a great breakfast or dessert or mid-day snack! Oh, I love pumpkin!

P.S. Have I mentioned that when I was growing up, my family got on a kick where we named all of our pets after food? My first dog, a Sheltie, was named Pumpkin. It's true.

Festive Fudge

Jonathan and I watched Julie & Julia the other night! It was such a good movie, and it immediately made me want to jump in the kitchen to whip something yummy up to eat! Surprisingly, Jonathan got the itch too, so he started rummaging through my cookbooks to find something delicious that he wanted to make!

He settled on this cookbook:


He decided on two recipes: Festive Fudge and Hershey's Best Loved Chocolate Cheesecake:


We made the fudge on Monday night and it was so easy and so delicious! Tonight we are going to make the chocolate cheesecake! I'll let you know how it turns out!

Here is the recipe for the Festive Fudge (sorry for the lack of a picture):

FESTIVE FUDGE

3 cups (1 1/2 packages, 12 ounces each) Hershey's Semi-Sweet Chocolate Chips
1 can (14 ounces) sweetened condensed milk
Dash of salt
1/2 to 1 cup chopped nuts (optional)
1 1/2 teaspoons vanilla extract
1 cup Reese's peanut butter chips
1/2 cup whipping cream

Directions:
1. Line 8- or 9-inch square pan with wax paper
2. Melt chocolate chips with sweetened condensed milk and salt in heavy saucepan over low heat. Remove from heat; stir in nuts, if desired, and vanilla. Spread evenly into prepared pan.
3. In another heavy saucepan, melt 1 cup Reese's Peanut Butter Chips with 1/2 cup whipping cream. Stir until thick and smooth. Spread over fudge.
4. Refrigerate 2 hours or until firm. Turn fudge onto cutting board, peel off paper, and cut into squares. Store covered in refrigerator.

Delicious! And such a great idea to give out as Christmas goodies! Jonathan is not allowed to make things like this in our kitchen only to leave them in the fridge to call my name all day long, so he is bringing a majority of the fudge to his office. (And I think he'll be doing the same with the chocolate cheesecake because it's just not fair to leave it in there yelling at me to eat it all day long!)

Please make some and eat some. It will make your mouth happy!